

This feature is only available for customers on an Enterprise plan, and is restricted to Owner and Admin user roles. Please contact your Customer Support Manager or support@mezmo.com for more information.
Step 1: Get Your Mezmo Single Sign On URL
- In your Mezmo app go to Settings > Organization > Access Management.
- Go to SAML Configuration and copy the URL under Single Sign On URL.
- Keep this URL available since it will be used in Step 2: Configure Okta.
Step 2: Configure Okta
- In Okta go to Applications > Applications.
- Click Create App Integration.
- In the window, choose SAML 2.0.
- Fill out General Settings.
- In the next window, enter the Mezmo single sign on URL from Step 1: Get Your Mezmo Single Sign On URL
- Make sure Recipient URL and Destination URL are checked.
- Set the Audience URI (SP Entity ID) to your account ID. At the end of your URL. For example,
https://app.mezmo.com/auth/saml-consume/<AccountID>. You can leave the rest of the options as is. - Fill out step 3 Feedback.
Step 3: SAML Configuration
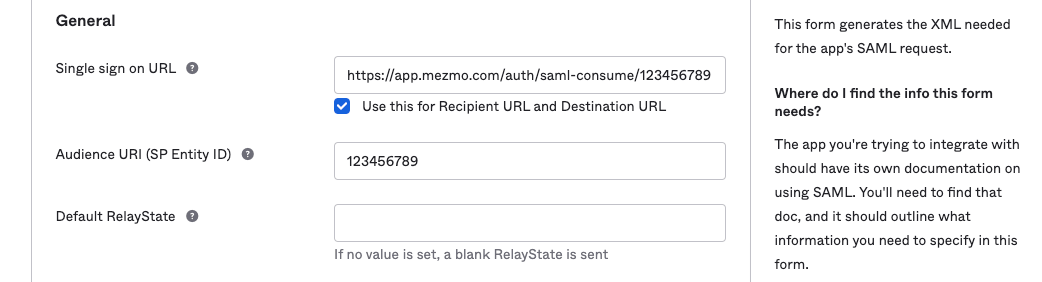
Add your Mezmo Sign On URL to Single Sign On URL. Then set your Audience URI to your account ID.
- In Okta, on the settings page, click the button; View SAML setup instructions.
- If not already done, in Mezmo, select configure manually.
- Copy the Identity Provider Single Sign-On URL in Okta to Identity provider sign-in URL in Mezmo.
- Download the X.509 Certificate from Okta and upload it to Mezmo.
- Save your config in Mezmo.
- You can also copy and save the XML data on Okta under Optional and upload it to Mezmo.